Building a mobile tiny house is one of the major reasons many people choose to go tiny in the first place. A tiny house on wheels (THOW) allows you to take your home with you while you work remotely and travel across the country.
So how do you build a tiny home on wheels? Once you have a plan and materials ready, you can systematically build your tiny house from the trailer up to framing then installing electricity, insulation, siding, and interior walls plus flooring.
Pros and Cons of a Mobile Tiny House
Before you decide to build a tiny house on wheels, it’s important to weigh the pros and cons of actually constructing and living in one. Here are some common benefits and drawbacks to living in a tiny home:
| Pros | Cons |
| More savings: A tiny house is much cheaper to build or buy compared to a normal-size home. It takes up less square footage, can be built with recycled materials, and can even be DIY-ed to save on labor costs. Once built, you can also have extra savings from utilities because you can use smaller appliances, collect rainwater, and install solar panels. | Not for everyone: It can be difficult to share 200 sq. ft. of space with a large family as there is no privacy for anyone in a tiny home. People with medical conditions, disabilities, or mental health problems may also have a harder time inside a small space. Before deciding on going tiny, it’s best to assess your needs and capabilities first. |
| Infinitely customizable: You can customize your tiny house according to your needs and personal style. As tiny homes can be limited in space, it’s a fun, creative challenge to come up with design solutions for the house’s layout and furnishings. | Limited regulations: The tiny house movement is a fairly new phenomenon so not every state has regulations in place for them. You may find that tiny homes are not legal in your area as the buildings are considered to be too small to serve as a residential structure. |
| Eco-friendly: Living in a THOW is often equated to living green. With a smaller house built from recycled materials, you consume less space and energy. It’s easier to heat or cool your home through the seasons and use less water and electricity overall. | Lifestyle changes: You can expect to have significant lifestyle changes if you live in a THOW as you would have to downsize all your furniture, decor, and clothes. Even basic activities like cooking, storing food, and using a toilet would be completely new (and possibly tricky) experiences you would have to learn from. |
What You Need to Know About Building a THOW
A tiny house on wheels can be a complicated build because you need to figure out how to bring an entire structure around. When planning to build a THOW, consider the following:
Trailers and weight
Your THOW is more vehicle than building which is why you have to prioritize safety considerations. For example, you have to estimate how much your tiny home and everything in it will weigh so you can think about how to tow it with your truck. Most lightweight tiny houses require a half ton vehicle with a trailer for smooth driving. The four trailer types commonly used for THOWs are drop axle, bumper pull, gooseneck, and deckover.
Building codes and zoning regulations
In many states, it isn’t easy to legally build a tiny home for full time use as most zoning laws and building codes require a minimum square footage, as well as other requirements like a certain number of windows to serve as fire escapes.
As a THOW, most states would legally consider it as a recreational vehicle (RV) which means you will need a license plate and a place to park your house. States with more flexible regulations include California, Colorado, Florida, Massachusetts, Michigan, New York, Oregon, and Texas.
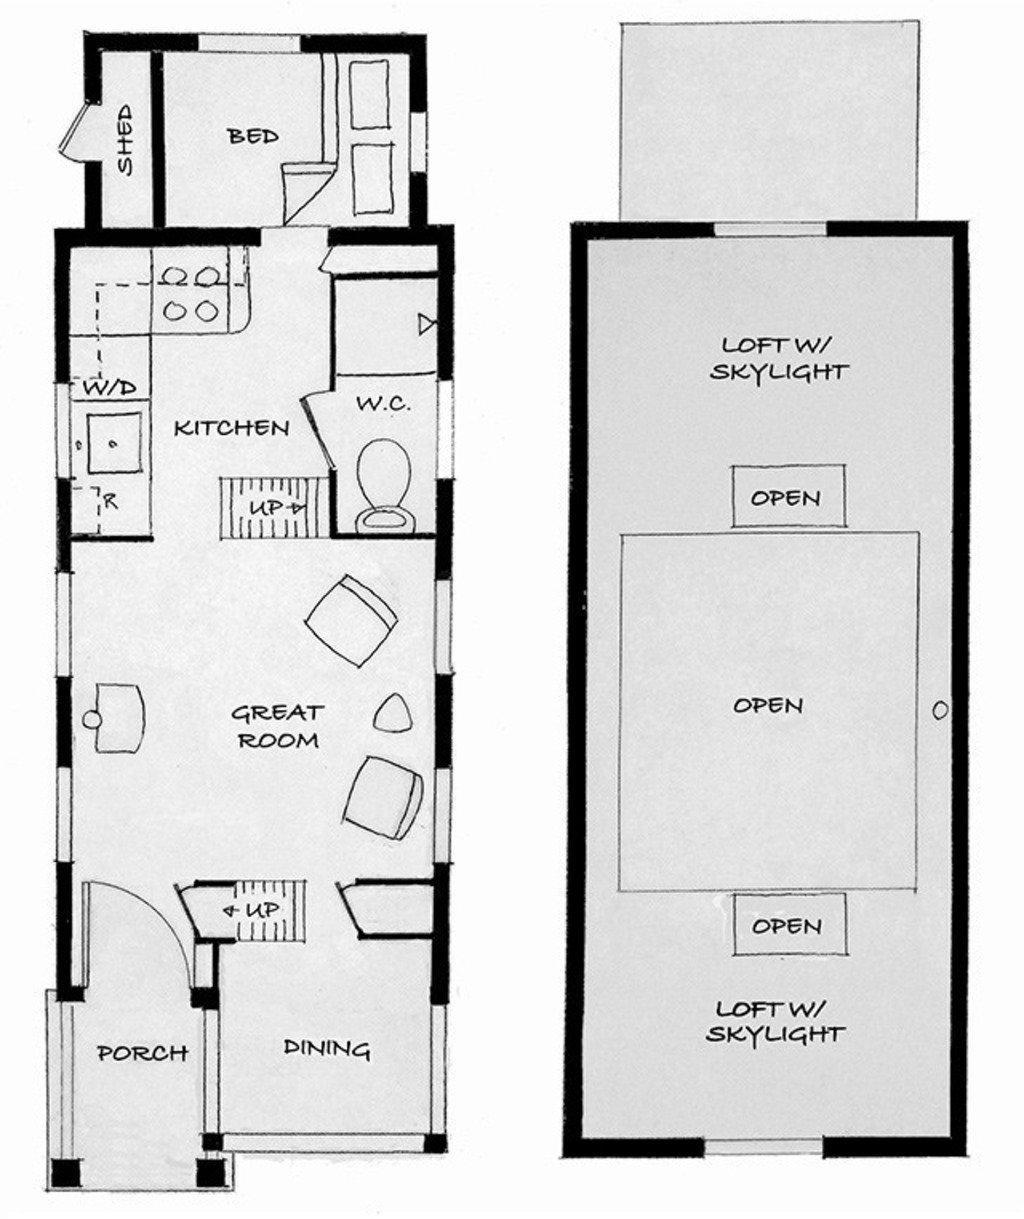
Design and space limitations
You can expect your tiny home to look a little different in terms of design, layout, and space. Unless you plan out the details carefully, you may have limited storage as you make room for:
- Single, double, or connected lofts
- Kitchen, living space, and bathroom
- Roof type
- Flooring
- Insulation
- Electrical wiring
- Plumbing and toilet options
- Wall paneling and windows
Once you have these basic ‘bones’ in place, only then can you think of appliances, fixtures, and furniture choices.
Average cost
The budget plays a big role as to how luxurious your tiny house will be. The average cost of building a THOW usually falls between $30,000 - $60,000. However, some homes can cost as little as $8000 if you’re using reclaimed materials and doing the work yourself.
If you’re more comfortable having a professional construct your house, you can expect to spend a bit more. You can also opt to order a prefabricated tiny home, although you might have less options for customization. On the pricier side, tiny houses can cost up to $150,000 but this depends on how many frills you wish to feature.
How to Plan and Construct Your Tiny House on Wheels
There are three physical forces that make building a THOW different from a foundational tiny house:
- Weight restrictions
- Vibration from transportation
- Upward lifting forces and storm winds
Because a tiny house on wheels travels, it needs to be much stronger than a traditional house. Here are some of the basic steps you need to take when building your tiny home on wheels:
Step 1: Brainstorming
Without a good construction plan, the end-results of the build might not be successful. It helps to answer the following questions first:
- How many occupants will be residing in this tiny house?
- What is the climate of the area you want to live in?
- How often will you move the house?
- What are your state’s highway regulations?
- How will you access water, electricity, and ventilation?
Once you have the answers to these questions, you would have a better sense of how much living space you may need and determine which features are a must-have in your tiny home. From there, you can create a rough plan, determine your budget, and visit or research other tiny houses to get a better idea of what your tiny house will become.
Step 2: Drafting plans
Your construction plans are going to guide your tiny house project so you can either draw them yourself or purchase existing plans online that are suitable to your requirements. Although the latter might not leave a lot of room for customization, you do get the benefit of having validated specifications and a bill of materials ready to go.
At this stage, you should think about the entire process of the build: from getting the trailer to the build suite to how you’ll get it out afterwards. You need to visualize where problems may arise. It’s good to think about the details such as how furniture like your sofa and bed will fit in, for example.
Step 3: Purchasing building materials
The amount of building materials you will need to buy ultimately depends on the size of your tiny house and the style of framing you’re planning on. You can either build your home with conventional methods or try advanced framing, an alternative technique that allows you to use less materials.
If possible, schedule ordering your materials so they arrive exactly when you need them. As much as possible, make sure you have all the proper supplies and tools ready before the build.
<See our guide on lightweight building materials here.>
Step 4: Beginning with the trailer
The trailer is essentially the foundation of your THOW so it has to be sturdy and square. The trailer axle should be rated for a higher load than the total weight of the house. You have multiple options for the trailer: purchasing a brand new or second-hand trailer, ordering a custom made one, or building it yourself.
As it is the foundation, you should also insulate the ‘floor’ of your house if you live in a cold climate. Air can move under the trailer so you will need to install layers of expanded polystyrene under the house and fill small gaps with spray foam.
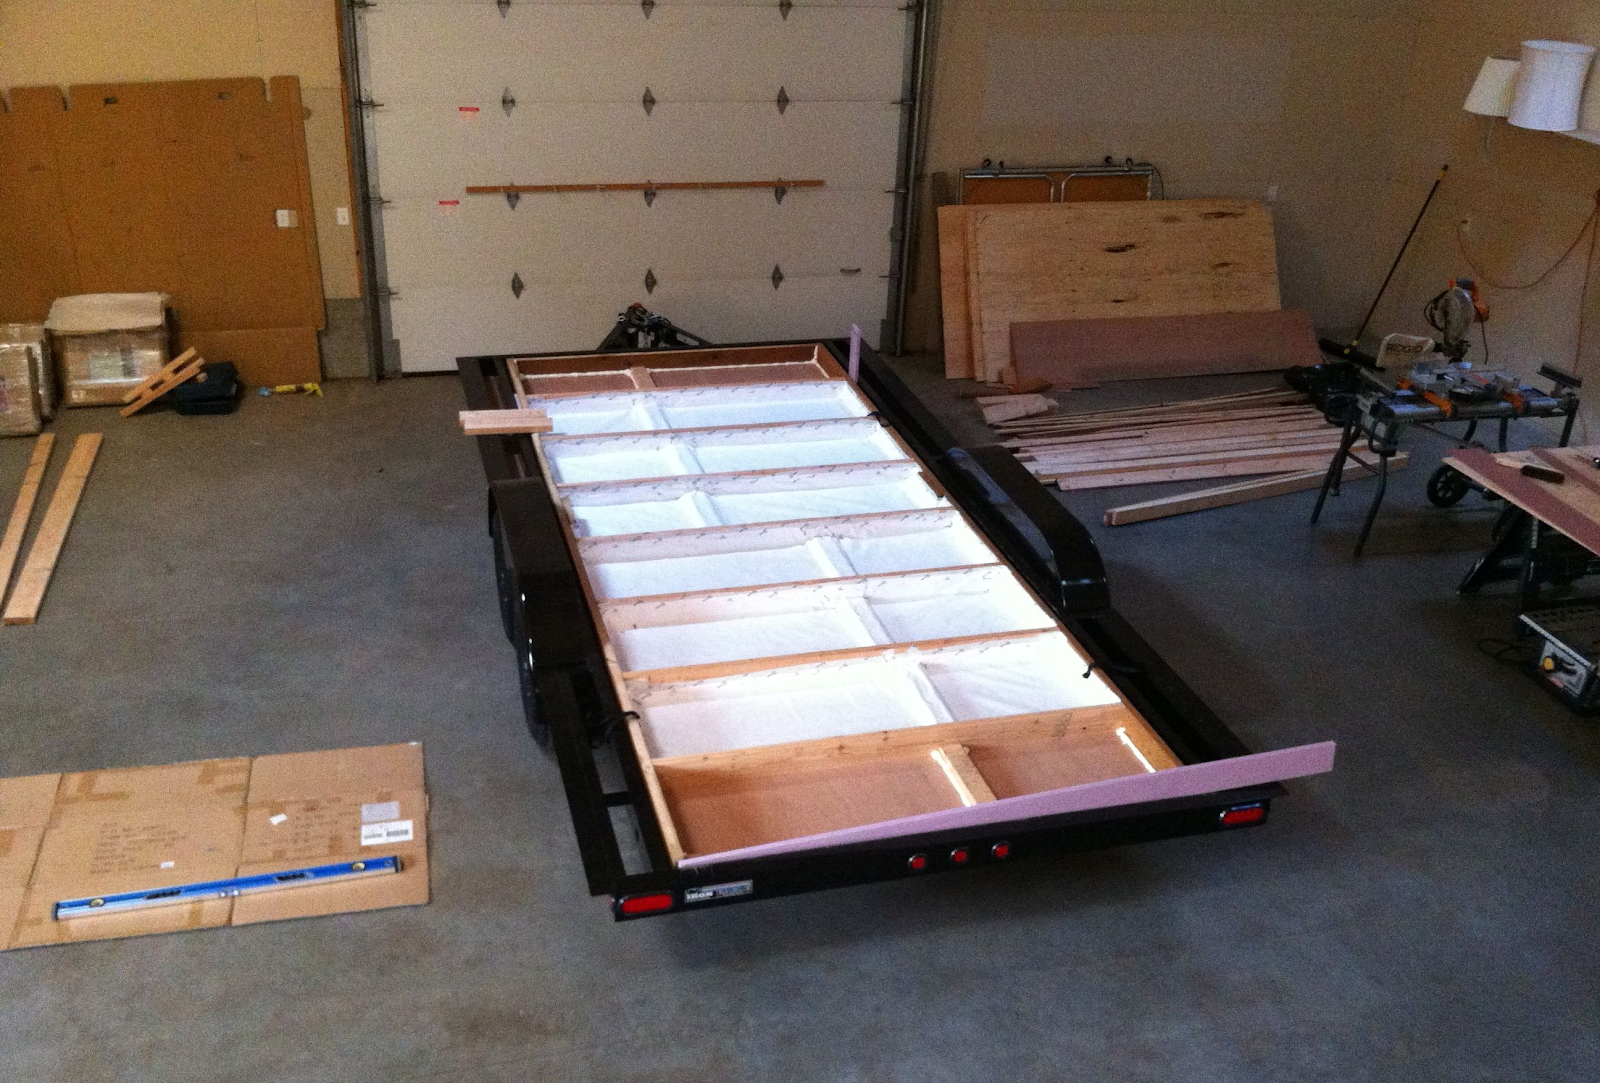
Step 5: Framing the floor
Your floor is the foundational frame of the tiny house and it has a simple structure made of 2x4s aligned with the metal beams of the trailer underneath. This becomes the solid base with which you anchor your structure on. Once you attach the metal flashing to keep the tiny house anchored, you can then add the insulation and vapor barrier to your home. Finally, you can install a subfloor ready to receive your four wall frames.
Step 6: Framing the walls
Framing the walls is not as complicated compared to the rest of construction but you will need to know the exact size of your doors and windows before beginning. It’s recommended you begin with the tallest wall so you can build it flat on the trailer then raise it vertically once it’s done. Once all the walls are built and raised, keep them square and vertical by screwing a temporary piece of lumber on each one so they remain square as you attach the other walls together.
<See our guide on framing here.>
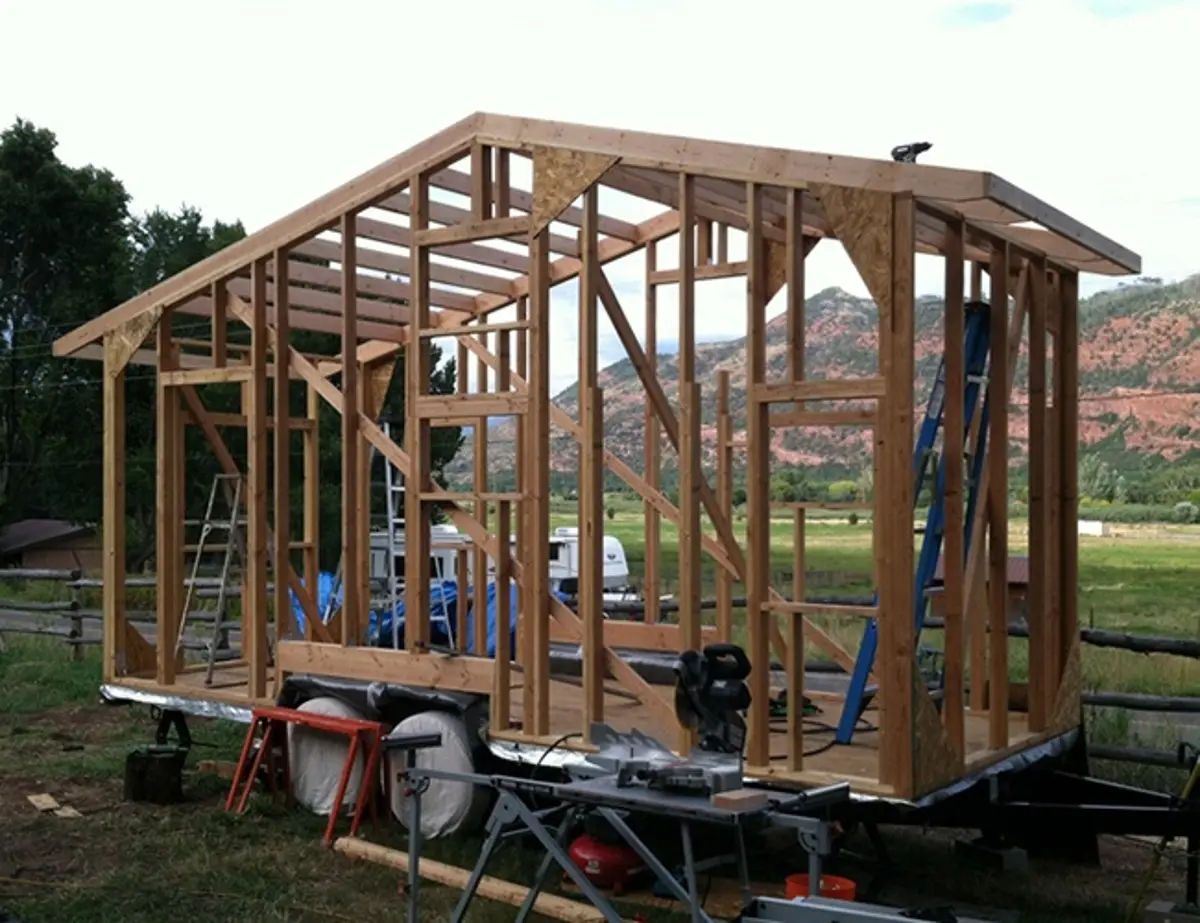
Step 7: Framing the roof
The roof is the last thing you need to frame and it’s one of the most crucial ones. If you’re living in an area that receives a lot of heavy rain or snow, you need to calculate the load for stronger roof support. You may also consider installing larger roof rafters to prevent leaks or water damage. The style of roof you go for will influence your choices in materials.
<See our guide on roofing materials here.>
Step 8: Installing electricity and insulation
The wires of your tiny home should be installed before you fill the wall gaps with insulation. This is the right time to decide where all your lights, outlets, switches, and appliances will be located. It’s also a good idea to read the electrical code for your area to implement best practices. If you want a THOW that can easily go off-grid, installing solar panels would be an energy-efficient idea as well.
Once you have finished wiring your tiny home, you can begin with insulating your house with your material of choice so you won’t have a hard time during hot or cold months. Remember that insulation cannot be replaced easily so it must be installed properly in your roof, walls, and floors.

Step 9: Putting up exterior siding
Siding your house will not be as critical as framing the wall or installing insulation so you can simply choose a material that fits your taste and personal budget well. Be sure to find lightweight, water-resistant and sun-resistant siding attached with galvanized nails.
Step 10: Putting up interior walls, ceiling, and flooring
At this stage, you would have more freedom to choose the materials for an aesthetically-pleasing and lightweight interior. For your ceiling, be sure to staple a plastic film on the rafters if you have chosen a fibrous material for roof insulation. For the flooring, your ideal materials should be water-proof, easy to clean, and simple to install.
Once the flooring is done, you would have already built most of your mobile tiny home already. The next stages are figuring out what to do for ventilating, heating, plumbing, and furnishing your tiny home on wheels.
Ready to Build Your THOW?
A tiny house on wheels can bring you the best of both worlds: the stability and comfort of having a roof over your head plus the freedom to pack up and go to your next destination whenever you choose. If that is what you want for your life, then a THOW will be perfect for you. As long as you build it according to what you need, you can’t go wrong with your project.
The post How to Build a Tiny House on Wheels appeared first on Tiny House Bloom.
No comments:
Post a Comment